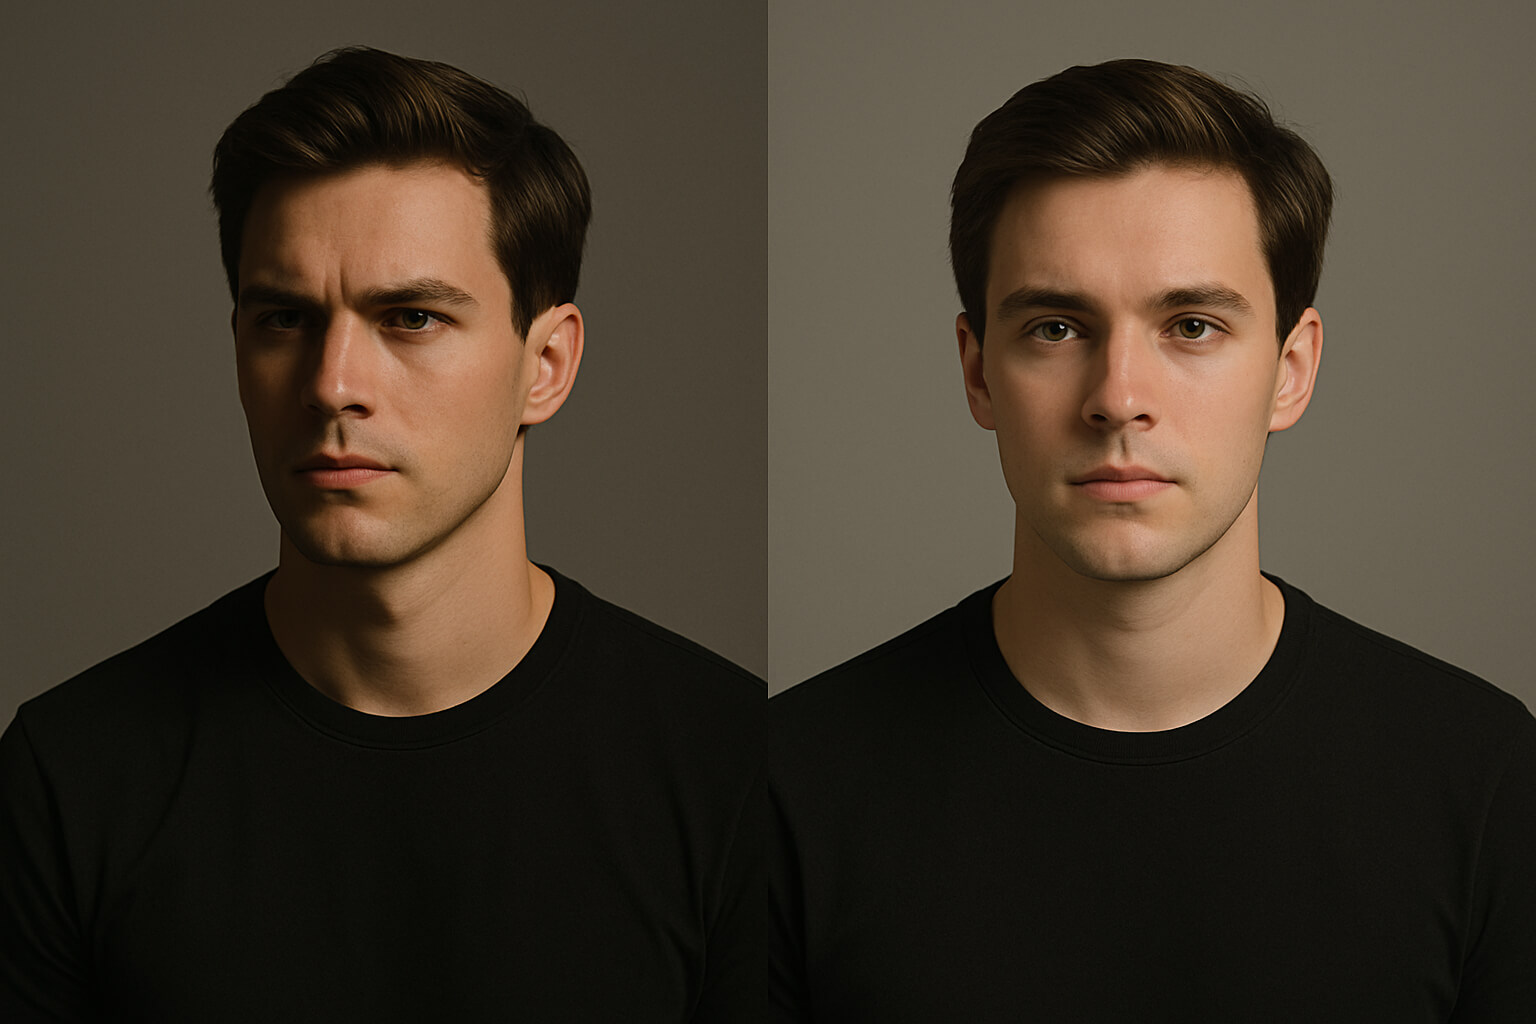
Hard vs. Soft Lighting: Key Differences for Photographers & Filmmakers

Lighting controls how your subject looks and feels. Understanding the differences between hard and soft lighting is essential to telling your story visually. Let’s break down each type in more detail.
What is Hard Lighting? — Detailed Explanation
Hard lighting is defined by sharp, well-defined shadows and high contrast. This happens because the light source is small relative to the subject and emits light rays in a direct, narrow path.
- Why are shadows sharp in hard lighting?
- The light rays travel almost in parallel lines from the source to the subject.
- Because the source is small and focused, shadows don’t blend or soften.
- Shadow edges are clearly delineated, creating a strong silhouette effect.
- Visual impact of hard lighting:
- Texture is emphasized: Wrinkles, pores, fabric patterns, and rough surfaces become more visible and tactile.
- Shape and contour are pronounced: Facial features and objects get a three-dimensional, sculpted look.
- Creates a dramatic mood: The high contrast can evoke tension, mystery, or intensity, perfect for storytelling that requires emotional depth
.
- Typical hard light sources:
- Midday sun: The sun acts as a relatively small, harsh light source.
- Bare flash or speedlight: Without modifiers, flashes produce concentrated beams of light.
- Spotlights and small desk lamps: Focused, undiffused bulbs.
- Flashlights or direct LEDs without diffusion.
- Ideal uses for hard lighting:
- Dramatic portraits: Emphasizes strong facial structure or ruggedness.
- Fashion/editorial photography: Highlights texture and bold styling.
- Product photography: When texture or shape is the selling point.
- Cinematic scenes: For mystery, suspense, or moody storytelling.
Example setup: Use a bare speedlight or spotlight aimed directly at your subject without diffusion. Learn more about working with controlled light here: Photography Artificial Lighting – A Beginner’s Guide
External product suggestions:
What is Soft Lighting? — Detailed Explanation
Soft lighting happens when the light source is large relative to the subject or when light is diffused through a material, spreading rays over a broader area.
- Why are shadows soft and diffused?
- The light rays come from multiple overlapping directions.
- Shadows created by different parts of the light source overlap, blurring their edges.
- Light “wraps” around the subject, filling in shadows gently.
- Visual impact of soft lighting:
- Texture is softened: Skin looks smoother; fine details and imperfections become less visible.
- Flattering and natural: Creates even skin tones and a gentle mood.
- Shadows have gradual transitions: No harsh lines, leading to a calm and pleasing aesthetic.
- Typical soft light sources:
- Cloudy or overcast daylight: Clouds act as a giant diffuser.
- Softboxes: Fabric boxes that diffuse flash or continuous light.
- Umbrellas: Reflect or diffuse light broadly.
- Window light through curtains: Natural but softened by fabric.
- Bounce light: Light reflected off walls or ceilings to enlarge the apparent light source.
- Ideal uses for soft lighting:
- Portraits and headshots: Flattering skin tones and smooth facial features.
- Product photography: When a clean, polished look is desired.
- Lifestyle shoots: Natural, inviting atmosphere.
- Wedding and newborn photography: Gentle, tender mood.
Example setup: Use a large softbox, umbrella, or natural window light filtered through sheer curtains. Explore soft lighting setups more here: Best Lighting Setup for Portrait Photography
External product suggestions:
How to Create Hard vs. Soft Light — Detailed Tips
- Hard Light Setup:
- Use a small, focused light source with no diffusion (bare flash, spotlight).
- Position the light farther from the subject so the source size appears smaller relative to the subject.
- Keep the light beam direct and avoid bounce or diffusion.
- Soft Light Setup:
- Use large light sources like softboxes, umbrellas, or bounce boards.
- Place the light close to your subject — closer means larger apparent source size and softer light.
- Diffuse your light using materials like diffusion panels, sheer fabric, or reflectors.
Want to master creative lighting setups? Check this out: What is Rembrandt Lighting in Photography?
When to Use Hard or Soft Lighting — Detailed Guidance
- Use soft lighting when:
- You want a clean, flattering, and natural look (portraits, headshots, lifestyle).
- Reducing texture and imperfections is important (newborns, weddings).
- A gentle, calm mood is desired.
- Use hard lighting when:
- You want to create drama, tension, or mystery (editorial portraits, cinematic shots).
- Texture, shape, and surface detail need to be emphasized (product or fashion shoots).
- High contrast is artistically important.
- Combining both adds complexity and depth.
Learn more about professional setups here: Best Lighting Setup for Streaming in 2025
Can You Mix Hard and Soft Lighting? — Detailed Explanation
Absolutely! Mixing light qualities can add dynamic visual interest.
- Use a soft key light to provide even, flattering illumination on the subject’s face or main area.
- Add a hard rim or kicker light from behind or the side to create sharp outlines and separation from the background.
- This blend enhances dimension and visual storytelling, common in cinematic and commercial photography.
Want to learn creative lighting techniques? Explore here: What is Split Lighting in Portrait Photography?
Final Thoughts
Hard and soft lighting are much more than technical terms. They are tools for storytelling, mood-setting, and defining form. Mastering the use of each—and knowing when to mix them—will give your work professional polish and emotional depth.
Related Reads:
