
June 06, 2025
Rembrandt lighting is one of the most iconic and widely used lighting techniques in portrait photography. Named after the famous Dutch painter Rembrandt, who famously used this lighting style in his portraits, this technique is all about creating a dramatic, yet flattering, lighting setup that emphasizes the contours of the face.
In this guide, we’ll take a deep dive into Rembrandt lighting, how to set it up, and the best tips to make the most of it in your portrait photography.
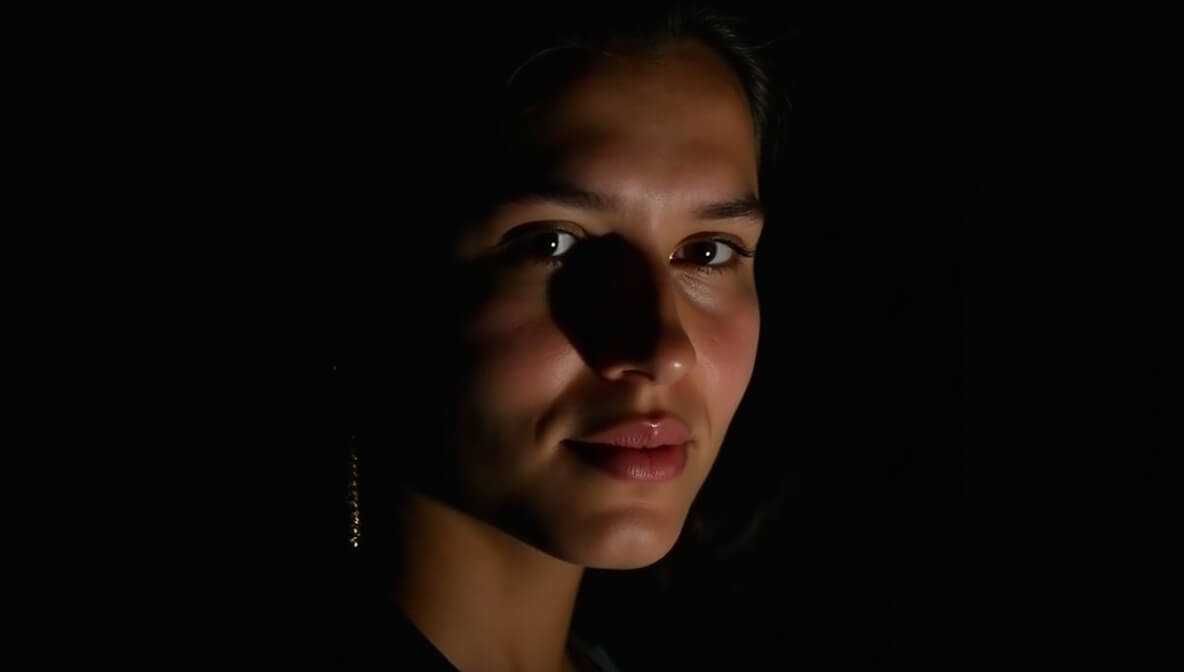
Rembrandt lighting is a type of lighting pattern used in portrait photography where the subject's face is illuminated by a single light source. The defining characteristic of Rembrandt lighting is the creation of a small triangle of light on the subject's cheek, which gives the face a three-dimensional look. This is done by positioning the light at a specific angle in relation to the subject’s face.
This technique creates a striking and dramatic effect with well-defined shadows, highlighting the structure of the face, especially the cheekbones and jawline, while still maintaining a natural, soft light.
Setting up Rembrandt lighting involves careful positioning of the light to achieve the signature triangle of light on the subject's cheek. Here’s how to do it step-by-step:
For photographers looking to establish a strong portfolio or photography business around Rembrandt lighting, How to Start a Photography Business from Scratch provides tips on positioning and branding yourself as an expert.
Rembrandt lighting is ideal for portraits where you want to emphasize the subject’s facial features and create a dramatic or classic look. Here are some situations where Rembrandt lighting works particularly well:
i. Dramatic and Emotional Portraits : High Drama: Rembrandt lighting is perfect for creating a high-contrast look that draws attention to the contours of the face. This setup works well for moody or emotional portraits where you want to convey a sense of mystery or power.
ii. Traditional and Classic Portraits : Timeless Look: The classic lighting pattern is ideal for fine art, traditional, or even corporate portraits. Its ability to sculpt the face naturally has made it a favorite of photographers looking to capture elegance and sophistication.
iii. Male Portraits : Strong Facial Features: Rembrandt lighting tends to work very well for men’s portraits, as it enhances their facial structure, particularly the cheekbones and jawline. The shadows created by the lighting add definition and strength to the face.
iv. Low-Key Photography : High Contrast: If you’re shooting in a low-key style (dark, moody portraits with deep shadows and minimal light), Rembrandt lighting is an excellent choice. It will give you the desired contrast between light and dark, making the subject pop against a darker background.
Why should you incorporate Rembrandt lighting into your photography? Here are a few advantages:
i. Flattering for Most Faces : The technique is versatile and works well with different face shapes. It helps to accentuate the cheekbones, jawline, and nose, creating a sculpted and flattering effect, even in people with rounder faces.
ii. Creates Depth and Dimension : Rembrandt lighting adds a sense of three-dimensionality to the face. The interplay between light and shadow enhances the subject’s features, creating a more dynamic and visually interesting portrait.
iii. Easy to Set Up : Rembrandt lighting doesn’t require complex gear or setups. All you need is one light source and a good understanding of the angle and position. If you’re just starting out with studio lighting, this is a great technique to master.
iv. Timeless and Classic Look : The style of lighting never goes out of fashion. It’s timeless and is used in everything from fine art to corporate headshots, ensuring that your portraits look sophisticated and professional for years to come.
While Rembrandt lighting can produce stunning results, there are a few mistakes that beginners (and even experienced photographers) often make:
1. Overexposing the Triangle : Too Much Light: If the triangle of light is too large or overly bright, the effect may be lost. Keep the light subtle and controlled, ensuring it complements the shadows rather than overpowering them.
2. Not Adjusting the Fill Light Properly : Too Much Fill Light: Adding too much fill light can soften the shadows and diminish the drama of the Rembrandt effect. A slight fill is usually enough to reveal detail in the dark areas without taking away from the lighting pattern.
3. Incorrect Light Positioning : No Triangle: If the light is too high or too low, you might lose the triangle of light altogether. The positioning of the light is critical to achieving the desired effect, so take the time to experiment with different angles and distances.
If you're working with clients, understanding how to edit your photos effectively is important for making sure you present the best results. Check out Photographer Editing and Protecting Copyrighted Photos for tips on editing and protecting your Rembrandt portraits.
To get the best Rembrandt lighting, consider using different lighting modifiers. These help control the quality and direction of the light, giving you more creative flexibility.
Rembrandt lighting is a powerful tool in portrait photography, capable of transforming a simple image into something extraordinary. By mastering this technique, you can create professional, high-quality portraits with dramatic contrasts and flattering light. Whether you're shooting in the studio or working with natural light, Rembrandt lighting will help you highlight your subject's best features while adding depth and dimension to your shots.
Stay up to date with the newest tips, gear reviews, and step-by-step guides to elevate your photography journey from home and beyond.