How to Do Light Painting Photography

June 13, 2025

By RocketPages

Photographer creating glowing spirals with LED wand in a long exposure nighttime scene.

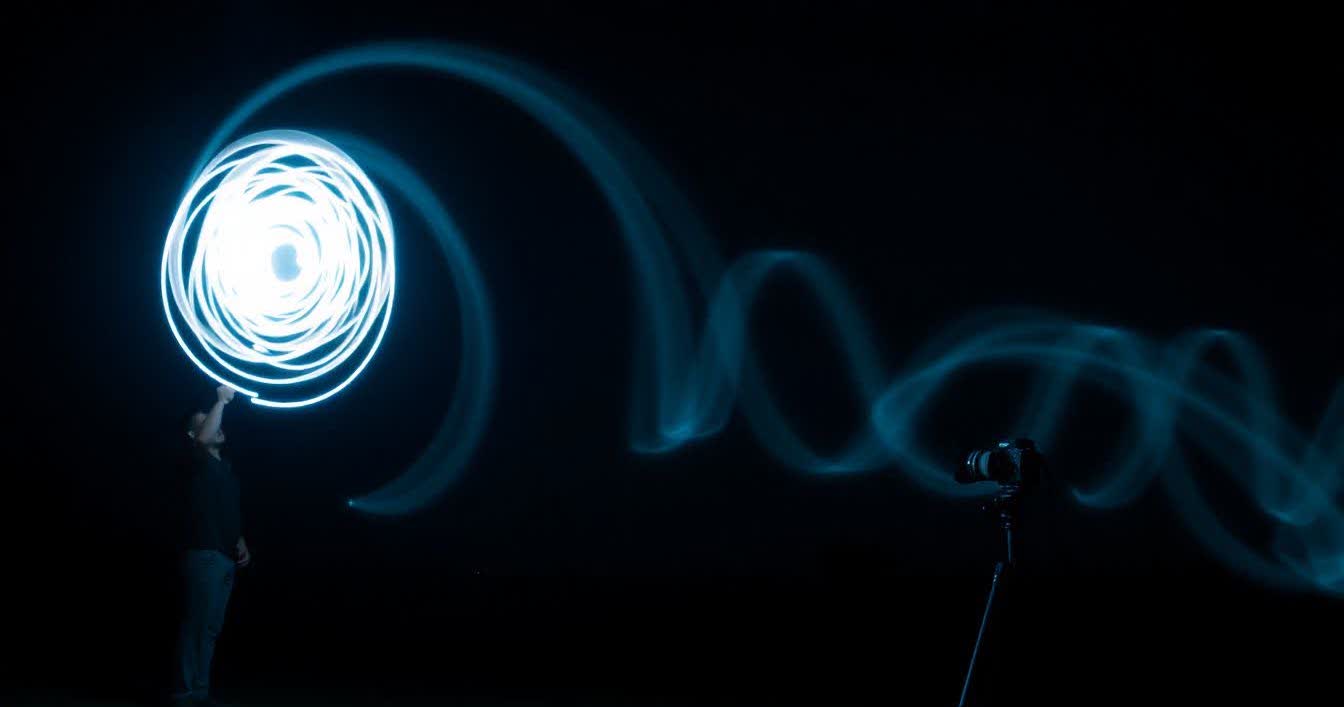
Light painting is a captivating and creative photography technique that uses long exposure while moving a light source to create mesmerizing, surreal images. This technique allows photographers to paint with light, creating

luminous trails, intricate patterns, and illuminated subjects that can transform any scene into a piece of art.


What Is Light Painting?


Light painting is a photographic technique where a light source, such as an LED wand, flashlight, or glow stick, is moved within or across the frame during a long exposure. As the camera captures the light’s movement over time, the result is an image with streaks of light that form patterns, shapes, or illuminated subjects. The magic lies in combining artistic creativity with technical control, allowing the photographer to craft unique and visually striking photographs.


For more on long exposure techniques, check out: Mastering Long Exposure Landscape Photography


Equipment You’ll Need


To execute light painting photography effectively, you’ll need a few essential pieces of equipment:


1. Camera

  • A DSLR or mirrorless camera is essential for light painting because it allows you to manually control settings like exposure time, ISO, and aperture. These settings give you the flexibility you need to capture light trails accurately. Choose a camera that offers manual exposure control for the best results.
  • Best Camera for Professional Photography Beginners in 2025
  • For some great DSLR and mirrorless camera options, visit B&H Photo (B&H Cameras).


2. Tripod

  • A sturdy tripod is critical to keep your camera steady during long exposure times. Without a tripod, camera shake would blur the light trails and ruin the shot. Choose a tripod that is durable and can be adjusted to different heights for varied shooting angles.
  • Best Tripods for Travel and Studio Photography
  • For a wide selection of tripods, check out Manfrotto Tripods (Manfrotto Official).


3. Light Sources

  • Light sources such as LED wands, flashlights, glow sticks, or even your smartphone’s flashlight can be used to "paint" in the frame. Each light source offers a unique effect, so experiment with different lights to create various visual styles.
  • Glow Sticks – Colorful, portable, and easy to handle.
  • LED Wands – Provide more consistent light and can produce stronger, defined patterns.
  • For a range of options, check out Lume Cube (Lume Cube Lighting Solutions) or Neewer LED Lights (Neewer on Amazon).


4. Remote Shutter Release

  • Using a remote shutter release helps to avoid any camera shake when you start and stop your exposure, which is crucial when working with long exposure photography.
  • Must-Have Camera Accessories
  • Check out the Vello FreeWave Plus Wireless Remote Shutter Release on Adorama (Adorama - Vello Remote).


Camera Settings for Light Painting


Proper camera settings are crucial when light painting to ensure the light trails are captured correctly:


1. Mode: Manual (M)

  • Set your camera to manual mode to control all the key settings such as ISO, aperture, and shutter speed.


2. ISO: 100-400

  • A lower ISO setting minimizes noise in the final image, as high ISO can introduce grain. For most light painting shots, ISO 100-400 is usually sufficient.


3. Aperture: f/8 to f/16

  • Use a narrow aperture (higher f-stop number) to ensure the entire scene, including the light trails, remains in focus. A wider aperture (e.g., f/2.8) can result in a shallow depth of field, blurring your light patterns.


4. Shutter Speed: 5 Seconds to Several Minutes

  • The shutter speed will depend on the complexity of your light painting. A typical range is from 5 seconds for simple drawings to several minutes for more intricate designs. Adjust accordingly based on the brightness of your light source.


5. Focus: Manual Focus

  • Switch to manual focus, as autofocus will struggle in low light conditions. Focus on a specific point in the scene, then lock the focus to prevent the camera from hunting for focus during the exposure.
  • For a complete guide to taking professional photos, check out: How to Take Professional-Looking Photos 2025


Creative Techniques for Light Painting


1. Drawing with Light

  • One of the most popular techniques in light painting is drawing in the air with handheld light sources. Whether you're creating abstract shapes, letters, or intricate designs, this technique gives you full control over the composition. Practice moving the light at different speeds to create varying patterns and effects.


2. Subject Illumination

  • Light painting isn't just about drawing in the air—it’s also about illuminating subjects in a creative way. Use light sources to highlight specific elements of a scene, like a person, object, or landscape, creating a stunning contrast with the surrounding darkness.
  • For product-focused setups, you can try techniques for portrait or still life photography: Best Lighting Setup for Product Photography


3. Light Trails

  • Another popular application of light painting is capturing moving objects like cars, bikes, or even stars. For example, light trails from passing cars can create dynamic, cinematic compositions. Experiment with long exposures to capture the motion, creating fluid, dynamic lines.
  • To learn more about capturing light trails, check out: How to Capture Light Trails in Photography


4. Combining Natural & Artificial Light

  • Combine your light painting with natural or artificial light sources in the environment. For example, blend a sunset or a cityscape with your light painting to add depth and drama to the composition. The interaction between the natural world and artificial light can create stunning contrasts and effects.
  • For tips on using both natural and artificial light, read:
  • How to Use Natural Light for Stunning Photos
  • Photography Artificial Lighting Guide


Post-Processing Your Light Paintings


After capturing your light paintings, post-processing can help you refine and enhance the final result:


1. Color Grading

Use color grading to enhance the vibrancy of your light trails or to set the mood of the scene. You can use editing software like Adobe Lightroom or Photoshop to fine-tune the hues and tones of the image. What Is Color Grading?


2. Object Removal

Sometimes unwanted distractions, like light spill or extraneous objects, can appear in your frame. Use editing tools to remove them, ensuring that your light patterns and subjects are the focus of the shot. How to Remove Unwanted Objects


3. Presets

If you want to streamline your workflow and maintain a consistent look across your light painting photos, using custom editing presets can save you time. Create or download presets that match your desired style. How to Make Your Own Photography Presets


4. Editing Apps

Use editing apps like Adobe Lightroom, VSCO, or Snapseed to refine your photos on the go. These apps allow you to adjust exposure, contrast, and saturation, making it easy to perfect your light painting images. Best Photo Editing Apps in 2025

For more robust editing tools, explore Adobe Creative Cloud (Adobe Lightroom).


Bonus Tips for Light Painting Success


1. Scout Your Location in Daylight

Familiarize yourself with the location during the day so you can plan your shots, find interesting compositions, and avoid hazards in the dark.


2. Wear Dark Clothing

If you’re moving light sources in front of the camera, wear dark clothing to prevent yourself from showing up in the frame.


3. Experiment with Different Light Tools

Try using various light sources—each one offers a different effect. You can even combine different tools in the same shot for more complex patterns.


4. Shoot in RAW

Shooting in RAW gives you the flexibility to adjust exposure and fine-tune colors during post-processing.

For more photography tips, see: Common Mistakes in Photography and How to Avoid Them


Why Light Painting Is Worth Learning


Light painting offers several benefits that make it an exciting technique to master:


1. Creative Freedom

Light painting allows you to break free from traditional photography rules and create completely unique images.


2. Stunning Visuals

This technique can produce captivating, visually dynamic photographs that stand out.


3. Indoors & Outdoors

Light painting can be done anywhere—whether you're in a studio or outdoors at night.


4. Exposure, Light, and Composition Mastery

Learning light painting helps you improve your technical skills in exposure, lighting, and composition, making you a more versatile photographer.


Recommended Products for Light Painting Photography


To take your light painting to the next level, here are some recommended products:


  • Lume Cube: Known for its powerful, portable LED lights that work great for light painting. Lume Cube
  • Neewer LED Lights: A cost-effective option for photographers looking for adjustable, color-changing LED lights. Available on Amazon: Neewer LED Lights
  • Glow Sticks & EL Wire: These can create dynamic light trails. Find them at local stores or on Amazon: Glow Sticks & EL Wire
  • Manfrotto Tripods: Reliable and stable tripods for long exposure shots. Check out the full range at Manfrotto


Conclusion


Light painting photography is an exciting and creative way to explore the intersection of art and technology. It allows you to transform simple long exposure shots into mesmerizing works of art that are both dynamic and visually stunning. By experimenting with different techniques, tools, and settings, you can create truly unique compositions that stand out in the world of photography.


Remember to plan your shots, use the right equipment, and most importantly—have fun experimenting with light! The possibilities for creativity in light painting are endless.


Feel free to explore more photography resources with these helpful links:


Recent Articles

Stay up to date with the newest tips, gear reviews, and step-by-step guides to elevate your photography journey from home and beyond.