Capturing light trails in photography can transform an ordinary scene into something magical. Whether you're photographing car lights streaking down a highway, fireworks lighting up the night sky, or the soft glow of city lights, light trails add an element of motion, excitement, and depth to your photos.
In this guide, we’ll break down everything you need to know to successfully capture light trails, from essential camera settings to tips for creative compositions.
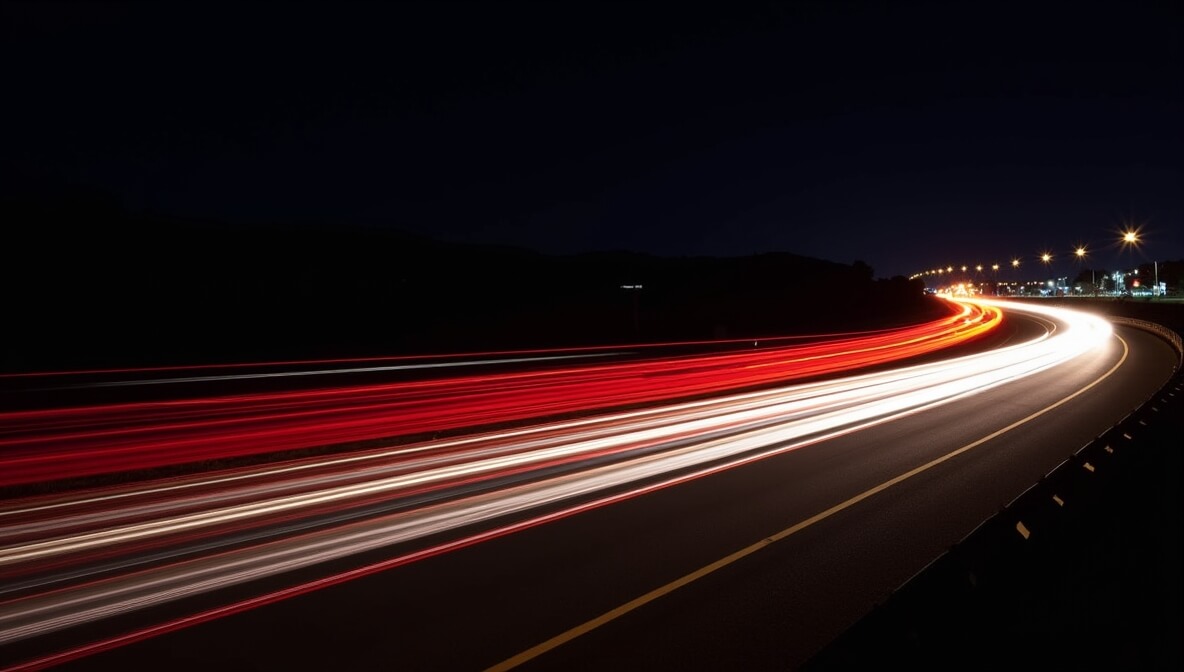
1. Understanding Light Trails: What Are They?
Light trails are created when a moving light source leaves a continuous mark on the camera’s sensor over time. This occurs when the shutter remains open for an extended period, allowing the moving light source to create a streak or trail across the image.
The key to great light trail photography is timing. Whether it’s a car passing by, an airplane flying overhead, or even someone holding a flashlight, these light sources will appear as trails in the photo as long as the exposure time is long enough to capture their movement.
2. Key Camera Settings for Light Trails
Getting the right settings is crucial for capturing the perfect light trail. Here’s a breakdown of the key settings you’ll need to adjust:
Shutter Speed
- Long Exposure: Light trails are created with long exposure times, typically ranging from 5 seconds to several minutes. A longer shutter speed will allow more light to pass through the lens, capturing the movement of the light source.
- Experiment with Exposure Time: The longer the exposure, the longer the light trail will be. If your trails appear too long, shorten the exposure time slightly.
Aperture
- f/8 to f/16: A smaller aperture (higher f-stop) is ideal for light trail photography because it helps increase the depth of field, keeping both the background and the light trail in focus. A setting of f/8 to f/16 should work in most cases.
ISO
- Low ISO (100-400): Keeping your ISO low is crucial to prevent grainy or noisy photos, which can be especially noticeable in dark areas of the image. Light trail photography typically requires low ISO settings to maintain a clean, sharp image.
Focus
- Manual Focus: Autofocus can struggle in low-light conditions, especially when photographing light trails. Switch your lens to manual focus and set it to infinity to ensure your scene is sharp and in focus.
For a deeper dive into camera settings, How to Start a Photography Business from Scratch offers great insights for anyone starting a photography business or improving their skills.
3. Choosing the Right Location and Subject
The location and subject matter of your light trail photograph are just as important as the technical aspects. Here are some ideas and considerations:
Light Source
- Cars and Vehicles: One of the most popular sources of light trails is car lights. Capture headlights (for forward motion) or taillights (for trailing motion) to create a beautiful light trail across the frame.
- Fireworks: Capturing fireworks as they explode in the night sky can result in stunning, colorful light trails.
- City Lights: Streetlights, neon signs, or even lights from passing buses can create beautiful light trails in urban environments.
Location
- Wide Open Spaces: Areas like highways, bridges, and intersections provide an opportunity to capture long streaks of light trails, especially from cars.
- High Elevations: For a more dramatic look, try shooting from higher ground, such as a hill or balcony. This offers a great vantage point for capturing light trails from moving traffic below.
- Nighttime or Low-Light Settings: The darker the environment, the more pronounced the light trails will be. Urban streets, highways, and even parking lots can create stunning effects at night.
If you’re aiming to attract high-paying clients for light trail photography, How to Get High-Paying Clients for Your Photography Business can help you refine your marketing strategy.
4. Creative Compositions for Light Trails
It’s not just about capturing the trail itself—creative compositions can make your light trail photos stand out. Here are some tips to enhance your composition:
Framing
- Leading Lines: Use natural or man-made lines (like roads, railways, or bridges) to guide the viewer's eye towards the light trail, creating a more dynamic and engaging image.
- Foreground and Background: Consider including elements of the foreground and background to add context. A well-lit skyline or distant mountain range can complement the light trails, making the image feel more connected.
Using Light Trails as a Subject
- Silhouettes: If you’re photographing light trails of cars, consider using a silhouette of a person, animal, or object in the foreground for a more dramatic effect. This adds a layer of depth and interest to the shot.
- Curves and Angles: Try to capture curves in the light trail, as these can create a more fluid, artistic look. Angled roads or intersections work great for this type of shot.
For those looking to build a strong portfolio of light trail photography for e-commerce or client-based work, How to Build a Photography Website for Clients in 2025 can help you create an impressive, professional website that showcases your best shots.
5. Essential Gear for Capturing Light Trails
While you can shoot light trails with almost any camera, having the right gear can make the process easier and more efficient:
Tripod
- Stability: A sturdy tripod is essential for long exposure shots, ensuring your camera remains perfectly still and sharp throughout the exposure. Even the smallest movement can result in blurred photos.
- Remote Shutter Release: To avoid camera shake when pressing the shutter button, use a remote shutter release or set the camera’s self-timer.
Camera with Manual Mode
- Control over Settings: A camera with manual settings is crucial for adjusting shutter speed, aperture, and ISO independently to achieve the perfect exposure for your light trails.
Lens
- Wide-Angle Lens: A wide-angle lens (e.g., 18mm-35mm) will allow you to capture more of the scene and the light trails, especially when photographing cars or long roads. A wide field of view also gives the trails room to stretch across the image.
- Lens with Low Aperture: If shooting in low light, a lens with a wide aperture (f/2.8 or wider) can help gather more light and ensure bright, clear photos.
Additionally, when working on your photography business, it’s essential to have the right tools for Editing and Protecting Your Photos. Proper editing and copyright protection ensure your work stays professional and secure.
6. Post-Processing Tips for Light Trails
After you’ve captured your light trail images, post-processing is an essential step to perfecting the final result. Here are some tips for editing light trail photos:
Adjust the Exposure
- Highlight the Trails: In post-processing, adjust the exposure to enhance the light trails. Brighten the trails without overexposing the rest of the image.
- Enhance Shadows and Highlights: Use Dodge and Burn techniques to add contrast to the trails and background, emphasizing the movement and adding depth to the photo.
Reduce Noise
- Noise Reduction: Light trail photography often involves long exposures in low-light environments, which can introduce noise. Use noise reduction tools to clean up the image and enhance clarity, especially in the darker areas.
Sharpening
- Fine-Tune Focus: Apply sharpening to make sure the light trails are crisp and clear. Be careful not to over-sharpen the background or foreground, as it could make the image look unnatural.
Conclusion
Capturing light trails is a thrilling way to add dynamic movement to your photography. With the right camera settings, gear, and creative techniques, you can create stunning photos that capture the magic of light in motion. Whether you're photographing car lights, fireworks, or city lights, the key is to experiment with exposure, composition, and lighting to create eye-catching results.
By incorporating these tips and tricks, you’ll be well on your way to mastering the art of light trail photography.