
June 10, 2025
Neon colors are known for their striking, high-contrast vibrancy, and can add a cinematic touch to any image. Whether you're shooting neon signs, urban nightlife, or creatively lit portraits, the art of capturing neon in photos requires the right technique, gear, and camera settings. Understanding how to photograph neon colors can help you create dramatic, eye-catching images that stand out from the crowd. Let’s dive into the best practices for shooting neon like a pro!
Neon lights emit intense, highly saturated colors that make them visually captivating but difficult to capture accurately. A few challenges you’ll encounter when photographing neon include:
Despite these challenges, when done correctly, neon photography creates a cinematic atmosphere that pulls viewers into the scene. It's all about striking the right balance and enhancing the beauty of the neon glow.
To effectively photograph neon colors, you’ll want to have full control over your camera settings. Shooting in manual mode is essential to prevent your camera from automatically adjusting settings that could cause overexposure or misrepresent neon hues.
1. ISO : Start with a low ISO setting (ISO 100 to 400) to prevent noise and grain. Neon lights themselves are quite bright, so you won’t need a high ISO. In fact, higher ISOs could introduce digital noise, particularly in darker areas of the image
.
For additional tips on shooting in low-light conditions, refer to this guide from DPReview: How to Shoot in Low Light.
2. Aperture : A wide aperture (such as f/1.8 to f/2.8) helps gather more light in low-light environments, and it also creates a shallow depth of field. This is ideal for portraits or subjects in front of neon lights because it allows the neon colors to pop while blurring the background.
For more about aperture settings, check out this in-depth explanation from B&H Photo Video: What Is Aperture in Photography?.
3. Shutter Speed :Since neon photography often involves capturing the dynamic glow and reflections, use slower shutter speeds (1/30s to 1/60s) for detailed shots without motion blur. However, to avoid long exposure blur, it’s best to use a tripod for stability, especially when capturing neon reflections.
Learn more about shutter speed and exposure from Canon USA: Understanding Shutter Speed in Photography.
4. White Balance : Neon lights can skew your white balance, making everything look too cool or warm. For the most accurate colors, set your white balance to Tungsten (often referred to as "Incandescent" on some cameras), which will help neutralize the overly warm tones of neon lights. You can also manually adjust the white balance to achieve the desired effect and retain the neon's true colors.
For further information on white balance, check this article from Adorama: Photography White Balance Guide.
For more insights on camera settings for low-light scenarios, check out our detailed guide on best camera settings for low light photography.
Neon lights are challenging but rewarding to photograph because of the way they interact with the surrounding environment. Achieving the perfect neon shot is all about managing the lighting.
1. Expose for the Lights : The primary source of light in neon photography is the neon itself. You may need to slightly underexpose the image to avoid overexposing the bright lights. This ensures that the neon colors appear vibrant and detailed, while the rest of the image remains properly lit.
Check out this article from Photodoto on mastering exposure: Photography Exposure 101.
2. Use Natural Reflections : Neon lights reflect beautifully in puddles, windows, or other shiny surfaces. Incorporating reflections can add depth and create more visually engaging photos. These reflections can help balance the intensity of neon colors by providing context and surrounding details.
3. Avoid Using Flash : Flash can overpower neon lighting and wash out the natural glow, reducing the atmospheric effect. Use ambient light to your advantage, and consider using long exposure if you're capturing an environment with moving elements.
For more about using natural lighting in photography, read Lifewire’s guide: How to Use Natural Light for Photography.
Composition is key when working with neon, as the light itself can become a major focal point. Here are a few creative techniques to enhance your neon shots:
1. Negative Space : Incorporating negative space in your composition can create a dramatic contrast between the neon light and the surrounding environment. Use shadows, darkness, or empty areas of the scene to highlight the brightness of the neon lights, making them pop. Learn more about negative space in photography.
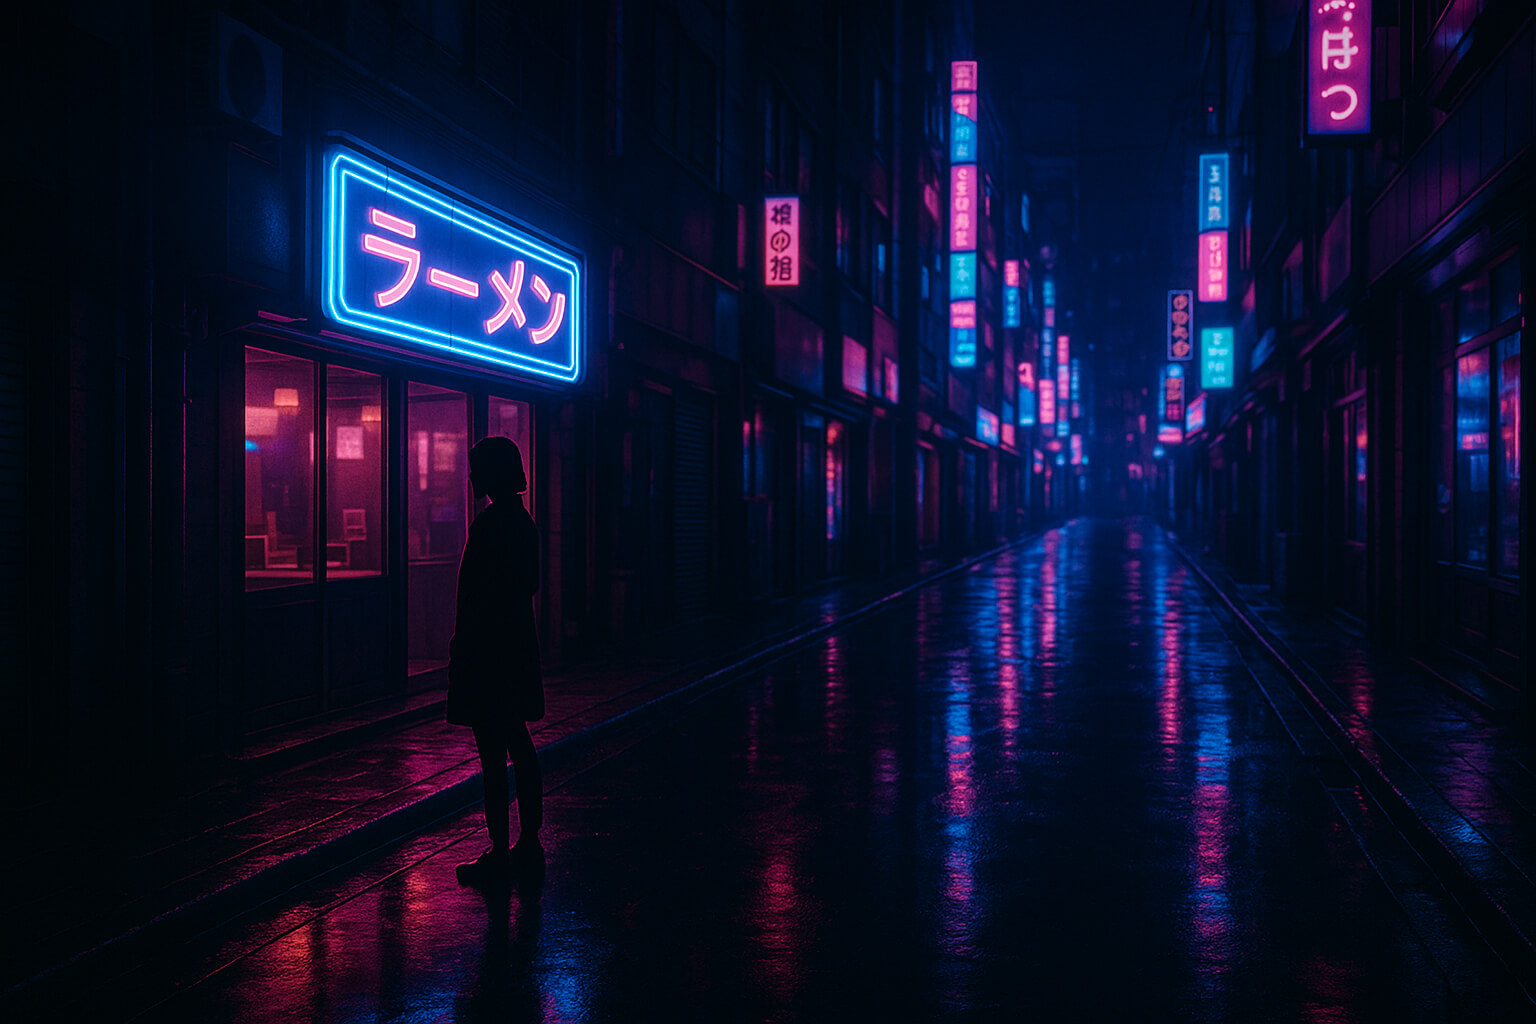
2. Silhouettes : A great way to create dramatic images with neon is to shoot subjects as silhouettes against a neon light. The sharp contrast between the dark subject and the bright lights will help you capture a visually striking, high-impact shot.
For more about using silhouettes, see The Photography Academy: How to Photograph Silhouettes.
3. Reflections and Bokeh : Neon lights reflect in surfaces like glass, mirrors, and puddles. Use a wide aperture to create a dreamy, blurred background filled with glowing bokeh. This technique is perfect for abstract shots or adding an artistic touch to your portraits.
4. Leading Lines : Neon lights often come in tube or strip forms, which can create natural leading lines that guide the viewer’s eye to the subject. Use these lines to direct attention to your subject and enhance the composition.
Also check out our guides on how to take creative reflection photos and how to take cinematic moody portraits.
Once you’ve captured your neon photos, editing is crucial for bringing out the full potential of your shots. Neon photography often requires post-processing to maintain balance and enhance the vibrancy of the colors.
1. Color Grading : Use color grading to enhance specific neon hues like blue, magenta, or green. Be careful not to oversaturate, as this can create unrealistic colors. Subtle adjustments can help create a dreamy, cinematic effect without losing the authenticity of the neon glow.
Check out Pixlr’s tutorial on color grading for beginners: Color Grading in Photography.
2. Noise Reduction : Low-light environments can introduce noise, especially in darker parts of the photo. Use noise reduction software like Lightroom or Photoshop to clean up the image and ensure a smoother look without sacrificing detail.
For more information on noise reduction techniques, see Photography Life’s detailed guide: How to Reduce Noise in Photoshop.
3. Contrast Tweaks : Enhancing the contrast between the neon lights and surrounding areas can make the lights pop. Deepen the blacks in the shadows while maintaining the vivid midtones to keep the scene dynamic.
Explore more editing tips in our articles on color grading in photography and color correction vs. color grading.
The right gear can make or break your neon photography experience. Here are some essential tools:
1. Lens : A fast prime lens, such as a 35mm f/1.4 or 50mm f/1.8, is ideal for neon photography. The wide aperture allows for better low-light performance and a shallow depth of field that isolates your subject from the background.
Check out The Camera Store for lens recommendations: Best Lenses for Low Light.
2. Camera : Choose a mirrorless or DSLR camera with strong low-light performance. Full-frame sensors generally handle noise better in low-light conditions, which is crucial when photographing neon lights.
Browse Digital Photography Review for top camera picks: Best Low Light Cameras 2025.
3. Tripod : A tripod is invaluable for long exposure shots. It helps eliminate camera shake and gives you more control over the composition, especially when using slow shutter speeds.
For a tripod buying guide, visit The Wirecutter: Best Tripods for Photography.
4. ND Filter : In rare cases, if you're shooting neon in bright daylight or harsh neon lights, a neutral density (ND) filter can help reduce exposure and prevent overexposure without altering the color balance.
Check out Photographylife for an in-depth guide on ND filters: Best ND Filters for Photography.
Photographing neon colors is an art that combines technical expertise with creativity. With the right settings, thoughtful composition, and some editing magic, you can create images that highlight the beauty and vibrancy of neon light. Whether you’re shooting in the heart of the city or capturing artistic portraits, these tips will help you master neon photography and capture images that glow with energy and atmosphere.
Stay up to date with the newest tips, gear reviews, and step-by-step guides to elevate your photography journey from home and beyond.