Glowing Moments

How to Nail Stunning Pregnancy Photoshoots

May 19, 2025

By RocketPages

post-image

The Beauty of the Bump


Pregnancy is a magical chapter in a woman’s life—full of change, growth, and anticipation. Every curve tells a story of love in progress, and maternity photography is the art of freezing that story in time. A pregnancy photoshoot is more than just snapping pictures—it’s a sacred session that honors life before it arrives.


Whether you’re a professional photographer looking to expand your portfolio or an expecting parent wanting to document the miracle of motherhood, this detailed guide will help you style, shoot, and share maternity images that stir the soul.


Step 1: Time It Just Right


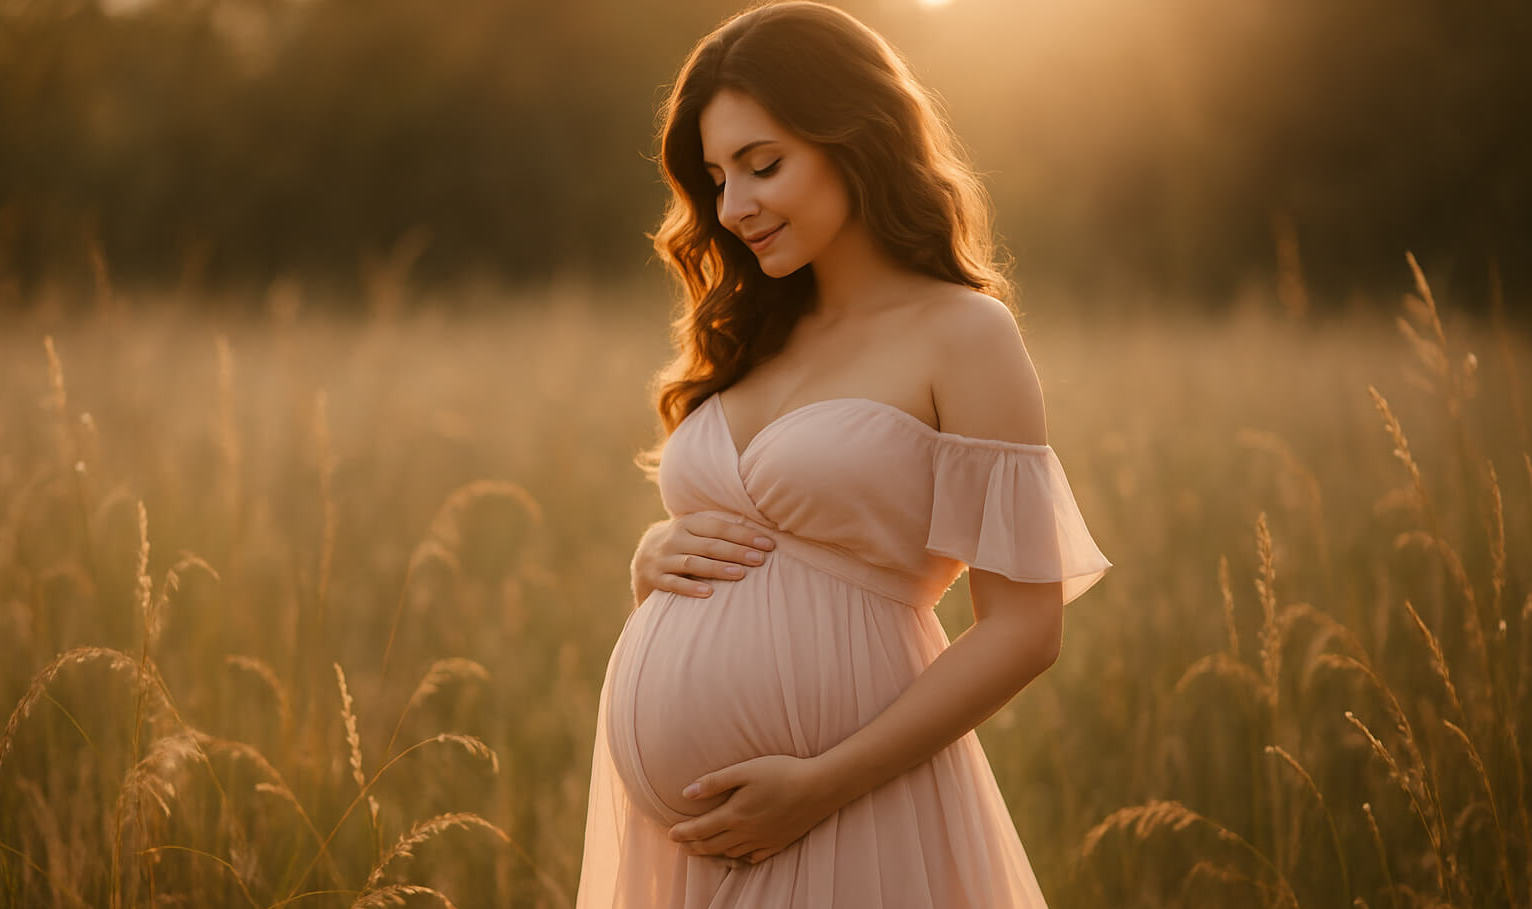
The golden rule of maternity photography is knowing when to shoot. The ideal window is between 28 and 36 weeks—that sweet spot when the baby bump is prominent, but the mama-to-be still feels relatively comfortable and mobile.


Lighting is just as crucial. Aim for the golden hour, when the sun hangs low and paints everything in soft, honey-toned light. It’s the same approach cinematic wedding photographers use to infuse their images with warmth and romance. This wedding photography guide outlines how to harness ambient light to tell deeper visual stories.


🎯 Pro Tip: Golden hour isn’t just about the sun—it’s about evoking emotion. Position your subject to backlight the bump for a soft, radiant halo effect.


Step 2: Styling & Wardrobe Magic


Styling your shoot is like setting the stage for a story. Whether you're going for a natural boho vibe, an ethereal goddess look, or a chic editorial style, make sure every detail—from fabric to location—supports that theme.


If you're aiming for something more artistic, try incorporating double exposure techniques. Imagine blending a silhouette of the mother with a blooming tree or ocean waves—this creates surreal, breathtaking maternity art that transcends the ordinary.


Creative Touch: Use translucent fabrics to create motion in your photos. When caught in a gentle breeze or fluttered by hand, they add grace and movement to static poses.


Step 3: Use the Right Gear


Maternity photoshoots don’t require the most expensive gear—but having the right tools can dramatically improve your outcomes. A good camera with reliable autofocus, great low-light performance, and sharp image quality is essential.


If you’re just starting out, consider equipment recommended in this guide on the best beginner cameras for 2025. A 50mm or 85mm prime lens is ideal for portraits, giving you that creamy background blur while keeping the subject crisp.


🛠️ Gear Suggestion: Use a tripod for hands-free shooting or long exposure shots—especially helpful if you're photographing yourself or working in changing light.


Step 4: Editing With Emotion


Once the session is complete, editing is your chance to sculpt the story. Subtle skin retouching, soft color grading, and light enhancements help bring the mood to life.


If you're working with vintage or scanned maternity prints, or simply want to restore emotional old family photos for a baby book, check out this list of photo restoration tools. These tools help remove imperfections, enhance faded images, and revive rich color tones.


🖌️ Editing Style Tips: Aim for warm tones, gentle contrast, and soft shadows. Avoid heavy filters that overpower the natural glow of the subject.


Step 5: Sell or Showcase Your Work


Maternity photos carry emotional value—but they also have market potential. With the right strategy, these photos can become a source of passive income. Softly lit, themed pregnancy shots are in high demand for stock websites, pregnancy blogs, baby product brands, and editorial use.


Start by reading this step-by-step guide to selling your photos online. You’ll learn how to price your photos, choose keywords, and upload them to top platforms. Speaking of which, here’s a rundown of the best photo-selling websites in 2025 to get you started.


📈 Monetization Tip: Bundle maternity shoots into themed packages—“Waiting for You,” “Blooming Love,” or “Nine Months of Magic”—and upload as storytelling sets.


Step 6: Prioritize Comfort and Connection


All the gear, lighting, and styling won’t matter if your subject isn’t comfortable. Keep your sessions relaxed, empathetic, and emotionally attuned. Allow for breaks, play calming music, and always check in with how the mama-to-be is feeling.


The more connected and safe she feels, the more authentic and powerful your images will be.


💬 Posing Prompt: Ask her to talk to her baby, or imagine holding them in her arms. Capture the expressions that follow—these unguarded moments are pure gold.


Final Thoughts: From Bump to Beautiful


Pregnancy photoshoots are intimate, creative, and deeply human. With thoughtful planning, storytelling techniques, and the right tools, you can capture timeless images that resonate with every heartbeat.


So whether you’re creating these photos for clients, yourself, or the world—do it with heart. Because few moments in life are as glowing, sacred, and worth remembering.

Recent Articles

Stay up to date with the newest tips, gear reviews, and step-by-step guides to elevate your photography journey from home and beyond.

Portrait of a woman at sunset with sun flare and golden background.
How to Create Beautiful Sun Flare Effects
Sun flare photography is all about embracing sunlight as a dramatic storytelling element. When captured intentionally, flares can add warmth, whimsy, or mystery to an image—transforming an ordinary scene into something magical. Whether you’re photographing portraits, landscapes, or everyday moments, learning how to create beautiful sun flare effects can elevate your work. In this guide, we’ll walk you through the best techniques and tips to master sun flare photography.What is Sun Flare in Photography?Sun flare occurs when light enters the lens directly and scatters internally, causing visible artifacts like glowing orbs, streaks, or haze. While traditionally considered a flaw, sun flare has become a stylistic choice embraced by photographers for its cinematic and dreamlike aesthetic. It’s often used to evoke emotion, create a nostalgic mood, or emphasize the warmth and energy of the sun.Sun flare can occur in various forms:Circular or Orb-like Flares: Perfect for dreamy, ethereal vibes.Streaked Flares: Great for a dramatic, almost surreal look.Haze or Glow: Adds soft light that can envelop your subject.When to Use Sun FlareSun flare can be used creatively in a variety of situations. Here’s when and how to use it:Golden Hour : Golden hour (the hour after sunrise or before sunset) is the perfect time to experiment with sun flare. During this time, the sun is lower and softer, which allows for beautiful light and less harsh contrast. The warmth of the light adds a golden, inviting hue to your images, making it the ideal backdrop for stunning sun flares.Backlighting Portraits : Backlighting, where the subject is lit from behind by the sun, creates a halo effect around your subject. This type of lighting works wonderfully for portraits—especially for emphasizing hair, creating a silhouette, or giving a dreamy aura to the shot. The sun flare can enhance this effect and make your subject stand out.Nature and Lifestyle Shots : Sun flare is especially effective for landscape or lifestyle photography, where it can infuse the image with warmth and a nostalgic feeling. Imagine a couple walking on a beach at sunset, a field of flowers swaying in the breeze, or a lone hiker trekking toward the horizon—the flare will add to the emotional depth and atmosphere.Looking to add a cinematic touch to your images? Learn how to shoot cinematic wedding photos for a stunning, professional effect that makes use of the natural beauty around you.How to Create Sun Flare Effects: Step-by-StepCreating beautiful sun flare effects is all about mastering light and positioning. Here's how to do it:Shoot Toward the Sun : To create sun flares, position your subject so that the sun is either directly behind them or just outside the frame. This allows the light to spill into the lens, creating the flare effect. Ensure that you have enough space in the frame for the flare to form and shape your image.Use a Small Aperture : The aperture controls how much light enters the camera, and using a smaller aperture (like f/16 or f/22) will produce the iconic star-shaped flares. These smaller apertures give the sun's rays a defined, angular shape that adds to the flare’s dramatic impact.Partially Obstruct the Sun : For a subtler, more controlled flare, you can partially hide the sun behind your subject—whether it’s a tree, building, or another object in the scene. This will reduce the intensity of the flare but still create a magical glow around the subject. The edges of the sun can peek through the obstruction, creating a soft and dreamy effect.Experiment with Lens Choice : Different lenses create different kinds of flares. Generally, prime lenses (lenses with a fixed focal length) tend to produce cleaner, more controlled flares, as they have fewer lens elements that can distort the light. However, zoom lenses might generate more complex, unique flare patterns. Experiment with different lenses to see how they affect your flare and find one that matches your desired aesthetic.Remove the Lens Hood : Lens hoods are designed to block stray light, which can help reduce flare. But for sun flare photography, you want the opposite. Removing the lens hood allows more light to enter the lens from different angles, which can produce beautiful flare effects. Just be cautious—without the hood, there’s a greater chance of unwanted lens flare, so experiment and adjust based on your needs.Use Manual Exposure Settings : Shooting toward the sun can often cause the image to be overexposed, especially in bright daylight. To maintain detail in the highlights and prevent the sky from being blown out, it’s important to use manual exposure settings. Adjust the ISO, shutter speed, and aperture until you achieve the perfect balance, keeping the highlights under control and preserving shadow detail.Enhance your photos and create professional flare effects with ease by using the best photo editing apps in 2025.Tips for Better Sun Flare ShotsWant to take your sun flare photography to the next level? Here are a few additional tips to consider:Clean Your Lens : Any dust, fingerprints, or smudges on your lens can distort the flare or create unwanted glare, making your photos less sharp. Always clean your lens before shooting, especially if you’re aiming for precise, clean flare effects.Bracket Exposures : When shooting into the sun, exposure can be tricky. To ensure you get the perfect shot, consider bracketing your exposures. Take multiple shots at different exposure levels, and choose the best one when editing. This gives you more flexibility in capturing the perfect balance of light and flare.Shoot in RAW Format : Shooting in RAW format preserves all the details in your image, especially in the highlights and shadows. This gives you more room to edit in post-production and ensure that the flare looks as magical as possible without losing any important details.Try Live View : Live view can be incredibly helpful when shooting into harsh light, like the sun. It allows you to see exactly how the light and flare are interacting with your subject, making it easier to frame and focus your shot.Interested in mastering studio lighting techniques too? Check out our beginner’s guide to artificial lighting for tips on using controlled lighting in studio settings. Composition Ideas with Sun FlaresSun flare can enhance your composition in multiple ways. Here are a few creative ideas for incorporating flare into your shots:Silhouettes : A great way to showcase sun flare is by creating silhouettes. Position your subject between the camera and the sun, allowing the flare to wrap around them. This creates a bold, striking contrast between the subject and the light.Lens Rainbow : Sun flares can create colorful streaks or rainbows when the light hits the lens at certain angles. These colorful flares can add a dreamy, whimsical feel to your photos. Play with the angle of the sun to see how the light bends through your lens and creates these vibrant streaks.Symmetry & Balance : If you’re photographing a scene with symmetry, like a road leading to the horizon or a perfectly centered tree, position the sun flare in a way that complements the composition. This creates balance and harmony in the image, drawing the viewer’s eye toward the flare as a focal point.Looking to expand your creative photography skills? Learn how to create artistic double exposure photos for a truly surreal look.Use Sun Flares in Your StyleIntegrating sun flare into your personal or brand style can make your work stand out. When done intentionally, flares can evoke emotion and mood that traditional lighting often cannot. Many photographers use sun flare to add a sense of nostalgia, romance, or energy to their images—making it a signature feature of their work.Ready to build your visual identity and create a brand for your photography? Discover how to grow your personal brand as a photographer for a unique and professional edge.ConclusionSun flare isn’t just a happy accident—it’s a creative tool. With the right timing, technique, and artistic touch, you can transform backlighting into powerful compositions that feel vibrant, emotional, and full of life. Experiment with different angles, apertures, and subjects to see how sun flares can elevate your work, adding an ethereal, cinematic quality to your photography.Remember: the best way to learn is to experiment boldly. Let the light in, embrace the flare, and make your photos glow with beauty.Looking for more gear or lens tips? Start with the best cameras for beginners to get started on your photography journey.
Read More
Macro shot of a green leaf with water droplets and blurred background.
How to Use a Macro Lens for Incredible Detail Shots
Macro photography opens up a whole new world of visual storytelling. It allows photographers to capture the minute details of everyday objects, revealing textures, patterns, and structures that often go unnoticed. Whether you’re shooting the delicate veins in a leaf, the intricate pattern of a butterfly’s wing, or the complex mechanical parts of a watch, a macro lens is your gateway to unlocking an entirely new realm of beauty.In this expanded guide, we’ll walk you through the essentials of macro photography, from understanding the gear to perfecting your techniques and post-processing. By the end of this guide, you’ll have the tools and knowledge to take stunning, detail-rich macro shots that will captivate your audience and possibly even become your next photography business venture.What is a Macro Lens?A macro lens is a type of lens specifically designed to capture small subjects at life-size or greater magnifications. This allows you to photograph tiny objects with remarkable detail, making them appear as though they’re larger than life. For a lens to be considered "macro," it should be able to achieve a 1:1 magnification ratio, meaning the subject on the sensor is the same size as it is in real life.Unlike standard lenses, which may lose sharpness or detail at close distances, macro lenses maintain their crispness and allow you to capture even the smallest textures in sharp detail. Common macro focal lengths include:50mm to 60mm: Ideal for flat objects, such as stamps, documents, or small products.90mm to 105mm: These lenses are versatile, perfect for photographing insects, flowers, and textured surfaces.150mm to 200mm: These longer lenses provide more working distance, making them excellent for photographing insects or wildlife that may be sensitive to close proximity.If you’re interested in turning your photography passion into a business, starting with a macro photography niche could be lucrative. Check out this guide to launching your photography business for tips on getting started.When and Why to Use a Macro LensMacro lenses are ideal for specific situations where detail and texture matter. Some common scenarios include:Product Photography : Macro lenses allow you to capture intricate details, engravings, and textures that other lenses simply can’t. Perfect for e-commerce websites or catalog photos, these lenses help bring out the fine details of products like jewelry, electronics, and watches.Nature Photography : Capture the stunning micro-world of insects, flowers, leaves, and even dewdrops. Macro photography reveals the hidden wonders of nature that may otherwise go unnoticed by the naked eye.Artistic Photography : Macro photography is an excellent medium for expressing texture, abstraction, and minimalism. By focusing on a small section of an object, you can create a beautiful abstract composition that intrigues viewers and allows them to focus on the texture and form.Scientific or Documentary Photography : For those documenting tiny objects or studying materials, macro lenses provide the ability to record subjects with accurate detail. This is essential for photographing specimens, chemical textures, or any subject that requires a high level of detail.Want to make money from your macro shots? Learn how to sell your photos online for passive income and turn your passion into profit.Tips for Stunning Macro PhotographyNow that you understand the basics of macro lenses, let’s dive into some essential tips that will help you capture stunning detail shots. 1. Use a TripodWhen shooting close-up at high magnifications, even the slightest movement can blur your image. To avoid this, use a sturdy tripod to stabilize your camera. A tripod ensures you get razor-sharp images, especially during longer exposure times, which are often required for low-light macro photography.Additionally, a macro rail can give you precise control over focusing, allowing you to take focus-stacked images where the subject is photographed multiple times at different focal points. These can later be combined in post-processing to create an image with a deep, extended depth of field. 2. Control Depth of FieldDepth of field (DOF) becomes incredibly shallow in macro photography. A wide aperture (low f-number) can result in only a tiny part of the subject being in focus, while the rest is blurred. To ensure more of your subject is sharp, use a smaller aperture (f/8 to f/16). Keep in mind that this will require slower shutter speeds, so a tripod is critical to avoid camera shake.To get the sharpest possible macro shots, consider focus stacking, where you take several shots at different focus points and then combine them in post-processing. This technique allows you to create an image where the entire subject is in focus, from front to back. 3. Use Manual FocusAutofocus can struggle in macro photography due to the tiny, often intricate details of your subject. Manual focus, paired with live view (zoomed in), gives you precise control over the focus point. With practice, this technique will become second nature, enabling you to focus on the most important elements of the subject. 4. Light It Right Lighting plays a crucial role in macro photography. The key challenge with close-up shots is that they often require precise lighting to avoid harsh shadows or overexposed areas.Natural Light: The soft, diffused light of early morning or overcast days works wonderfully for macro shots. Natural light brings out the details in textures without harsh contrast.Flash: If you're working in low light or need to control shadows, consider using a macro ring flash or twin flash to illuminate your subject evenly. These flashes are designed to minimize harsh shadows and provide even light coverage.Reflectors and Diffusers: Use reflectors to bounce light back onto your subject, softening the shadows. Diffusers help reduce the intensity of harsh sunlight, giving your image a softer, more even light.If you want to enhance your macro shots further, be sure to explore the best photo editing software in 2025 for refining your details.Recommended Gear for Macro PhotographyWhile the macro lens itself is essential, having the right supporting gear will make your macro photography journey much easier and more effective.Macro Lens (1:1): Consider the Canon EF 100mm f/2.8L, Nikon 105mm f/2.8 VR, or Sony 90mm f/2.8 G OSS lenses, which provide incredible sharpness and great working distances.Tripod: A lightweight tripod with a ball head and macro rail is ideal for maintaining stability.Diffusers/Reflectors: These will help soften or redirect the light to fill in shadows and highlight textures without creating harsh contrasts.Remote Shutter Release: Helps avoid camera shake, which is particularly noticeable in macro photography.Focus Rail: Allows for micro-adjustments in your focus, especially useful when doing focus stacking.Thinking about turning macro photography into a full-time career? Learn how to scale your photography business for success.Composition Ideas for Macro PhotographyMacro photography is not just about zooming in on an object—composition is just as important as the technical aspects. Here are some ideas to consider:Fill the Frame: Let your subject take up as much of the frame as possible. This draws attention to the minute details and textures.Negative Space: Sometimes, simplicity is key. Use negative space to create contrast between the subject and the background, making the subject pop.Patterns and Textures: The natural world is full of repeating patterns. Whether it’s the spirals in a seashell or the arrangement of leaves, these patterns add visual interest.Minimalism: Sometimes, less is more. Focus on one striking detail, such as the center of a flower or the pattern on an insect’s wing.Curious where to publish your best macro shots? Check out the best photography selling websites in 2025 for your next move.ConclusionMacro photography reveals the unseen, allowing you to capture the smallest and most intricate details of the world around you. By using the right lens, lighting, and techniques, you can take your macro shots from simple close-ups to stunning works of art.The world of macro photography is vast, and with the right tools and a keen eye for detail, you can open up an entirely new dimension of visual storytelling. Whether you're photographing tiny insects, delicate flowers, or intricate textures, your macro shots can capture the magic of life in its most minute form.*Want to turn your macro photography passion into a profitable business? Explore the best platforms for selling your photos and get started today!*Need guidance to build a strong foundation for your photography career? Learn how to start your photography business.
Read More
Black and white desert scene with sand dunes, strong shadows, and a lone photographer walking across the landscape.
How to Shoot Black and White Desert Photography
Black and white desert photography is a striking and emotive approach that transforms the arid beauty of the desert into timeless, artistic imagery. When you strip away color, the focus shifts to contrast, texture, composition, and mood. The desert, with its raw terrain, flowing dunes, and harsh lighting, offers the perfect environment for powerful monochrome photography. This guide will walk you through the essential aspects of shooting and editing black and white desert photos.Why Shoot Black and White in the Desert?Emphasizes Texture and Form: Without color, textures like sand ripples, cracks in the earth, and shadows on cactus plants come into sharp focus, drawing the viewer's eye to the intricate details of the landscape.Creates Emotional Depth: Black and white tones can invoke a sense of solitude, mystery, or nostalgia—emotions that can be deeply enhanced in the stark beauty of the desert.Controls Harsh Desert Lighting: Desert landscapes are characterized by bright sunlight and deep shadows. In black and white, these contrasts become assets, enhancing the drama and mood of the scene.Monochrome photography simplifies—yet deepens—your visual story.Essential Camera Settings & GearShoot in RAW : Shoot in RAW to give yourself the flexibility to adjust exposure, contrast, highlights, and shadows during post-processing. This is especially important when working with black and white imagery, as tonal details can be crucial in bringing out the right mood.Use Manual ModeAperture: f/8 to f/11 for a wide depth of fieldShutter Speed: Adjust based on light and movement; use a tripod for long exposures, especially during sunrise or sunset.ISO: Keep ISO between 100–400 to avoid introducing noise, which can flatten the image in monochrome photography.Gear TipsCamera: Any DSLR or mirrorless camera with manual settings will work well. Even if you’re just starting out, you can capture great shots with an entry-level camera.Lens: Use a wide-angle lens (16-35mm) to capture expansive dunes and telephoto lens (70-200mm) to isolate textures and elements like cacti.Tripod: Essential for stability, especially during long exposures at sunrise or sunset.Filters: A polarizing filter can deepen the contrast of the sky, while a red/orange filter can enhance tonal separation.For more tips on maximizing your gear and photography skills, check out resources on how to start a photography business from scratch.Best Times to Shoot in the DesertGolden Hour (Sunrise/Sunset): The soft light during golden hour creates long, dramatic shadows, perfect for highlighting desert textures.Midday: Surprisingly effective in black and white photography. The strong contrasts between light and dark can work well to produce dramatic results. Focus on capturing stark whites and deep blacks.Overcast Days: Diffused light on overcast days creates subtle tonal gradations, perfect for a calm and moody feel in desert scenes.In black and white, shadows are not flaws—they are your brushstrokes.If you're looking to monetize your landscape shots, consider using platforms like best photo selling websites for passive income.Composition Tips for Desert PhotographyFocus on Shapes and Lines : Look for leading lines in dunes or cracks in the earth to guide the viewer’s eye. S-curves and triangles can create dynamic compositions, and repeated patterns (e.g., dune ripples) help build visual rhythm in the scene.Play With Contrast : Maximize the power of contrast. Black and white photography allows you to play with light and dark elements, using them to create visual tension. Frame subjects where highlights meet shadows to amplify the contrast.Use Negative Space : The desert’s vast emptiness can be as powerful as the subject itself. A lone tree, cactus, or person silhouetted against the vast dunes can evoke feelings of isolation and solitude, creating a compelling emotional impact.Great desert photography is as much about what you exclude as what you capture.Post-Processing for Black & White Desert PhotographyConvert with Purpose : Instead of just desaturating your image, use conversion tools in Lightroom, Photoshop, or Capture One to have full tonal control. Adjust the individual colors (reds, yellows, etc.) to enhance specific elements of the scene.Boost Texture & Clarity : Use the Clarity and Texture sliders in Lightroom to enhance sand details and fine textures. Dodge & Burn selectively to deepen shadows and bring out highlights.Control Tonal Range : Adjust the blacks, shadows, midtones, highlights, and whites to fine-tune the tonal balance of your image. The Curves tool can also be used to adjust contrast and give the image a final sculpted look.Post-processing is your opportunity to emphasize the mood and lighting of your image.If you're thinking about diving deeper into photography or scaling a business, check out how to scale a photography business and go full-time.Pro Tips Before You GoUse Apps like PhotoPills: Planning your shoots in advance can help you understand how light and shadows will interact at different times of day, ensuring you get the best lighting for your shots.Protect Your Gear: Sand and heat can be harsh on your gear. Consider using weather-resistant bags and protective lens filters.Wear Neutral Colors: Avoid wearing bright colors that could reflect onto your subjects, affecting the shot.Stay Safe: Desert environments can be extreme, so always have water, a first aid kit, and a good understanding of the conditions.Bonus InspirationLook to iconic black and white photographers like Ansel Adams and Edward Weston for inspiration. Modern photographers using Instagram also showcase stunning black and white desert photography, turning simple dunes into minimalist masterpieces.The desert in black and white is not empty—it’s eloquent.If you’re interested in preserving and restoring your photos, explore the best photo restoration software in 2025.ConclusionBlack and white desert photography is more than just an aesthetic choice; it’s a way to tell a story through light, form, and texture. By focusing on key elements like contrast, shape, and post-processing techniques, you can create timeless, evocative images that transcend the limits of color photography. Grab your camera, head to the desert, and let the stark beauty of monochrome reveal itself.Want to make money from your photography? You can start monetizing your images and boost your income by learning how to sell your photos online for passive income in 2025.
Read More