How to Shoot Black and White Desert Photography

June 02, 2025

By RocketPages

Black and white desert scene with sand dunes, strong shadows, and a lone photographer walking across the landscape.

Black and white desert photography is a striking and emotive approach that transforms the arid beauty of the desert into timeless, artistic imagery. When you strip away color, the focus shifts to contrast, texture, composition, and mood. The desert, with its raw terrain, flowing dunes, and harsh lighting, offers the perfect environment for powerful monochrome photography. This guide will walk you through the essential aspects of shooting and editing black and white desert photos.


Why Shoot Black and White in the Desert?


  • Emphasizes Texture and Form: Without color, textures like sand ripples, cracks in the earth, and shadows on cactus plants come into sharp focus, drawing the viewer's eye to the intricate details of the landscape.
  • Creates Emotional Depth: Black and white tones can invoke a sense of solitude, mystery, or nostalgia—emotions that can be deeply enhanced in the stark beauty of the desert.
  • Controls Harsh Desert Lighting: Desert landscapes are characterized by bright sunlight and deep shadows. In black and white, these contrasts become assets, enhancing the drama and mood of the scene.


Monochrome photography simplifies—yet deepens—your visual story.


Essential Camera Settings & Gear


Shoot in RAW : Shoot in RAW to give yourself the flexibility to adjust exposure, contrast, highlights, and shadows during post-processing. This is especially important when working with black and white imagery, as tonal details can be crucial in bringing out the right mood.


Use Manual Mode


  • Aperture: f/8 to f/11 for a wide depth of field
  • Shutter Speed: Adjust based on light and movement; use a tripod for long exposures, especially during sunrise or sunset.
  • ISO: Keep ISO between 100–400 to avoid introducing noise, which can flatten the image in monochrome photography.


Gear Tips


  • Camera: Any DSLR or mirrorless camera with manual settings will work well. Even if you’re just starting out, you can capture great shots with an entry-level camera.
  • Lens: Use a wide-angle lens (16-35mm) to capture expansive dunes and telephoto lens (70-200mm) to isolate textures and elements like cacti.
  • Tripod: Essential for stability, especially during long exposures at sunrise or sunset.
  • Filters: A polarizing filter can deepen the contrast of the sky, while a red/orange filter can enhance tonal separation.


For more tips on maximizing your gear and photography skills, check out resources on how to start a photography business from scratch.


Best Times to Shoot in the Desert


  • Golden Hour (Sunrise/Sunset): The soft light during golden hour creates long, dramatic shadows, perfect for highlighting desert textures.
  • Midday: Surprisingly effective in black and white photography. The strong contrasts between light and dark can work well to produce dramatic results. Focus on capturing stark whites and deep blacks.
  • Overcast Days: Diffused light on overcast days creates subtle tonal gradations, perfect for a calm and moody feel in desert scenes.


In black and white, shadows are not flaws—they are your brushstrokes.
If you're looking to monetize your landscape shots, consider using platforms like best photo selling websites for passive income.


Composition Tips for Desert Photography


  • Focus on Shapes and Lines : Look for leading lines in dunes or cracks in the earth to guide the viewer’s eye. S-curves and triangles can create dynamic compositions, and repeated patterns (e.g., dune ripples) help build visual rhythm in the scene.
  • Play With Contrast : Maximize the power of contrast. Black and white photography allows you to play with light and dark elements, using them to create visual tension. Frame subjects where highlights meet shadows to amplify the contrast.
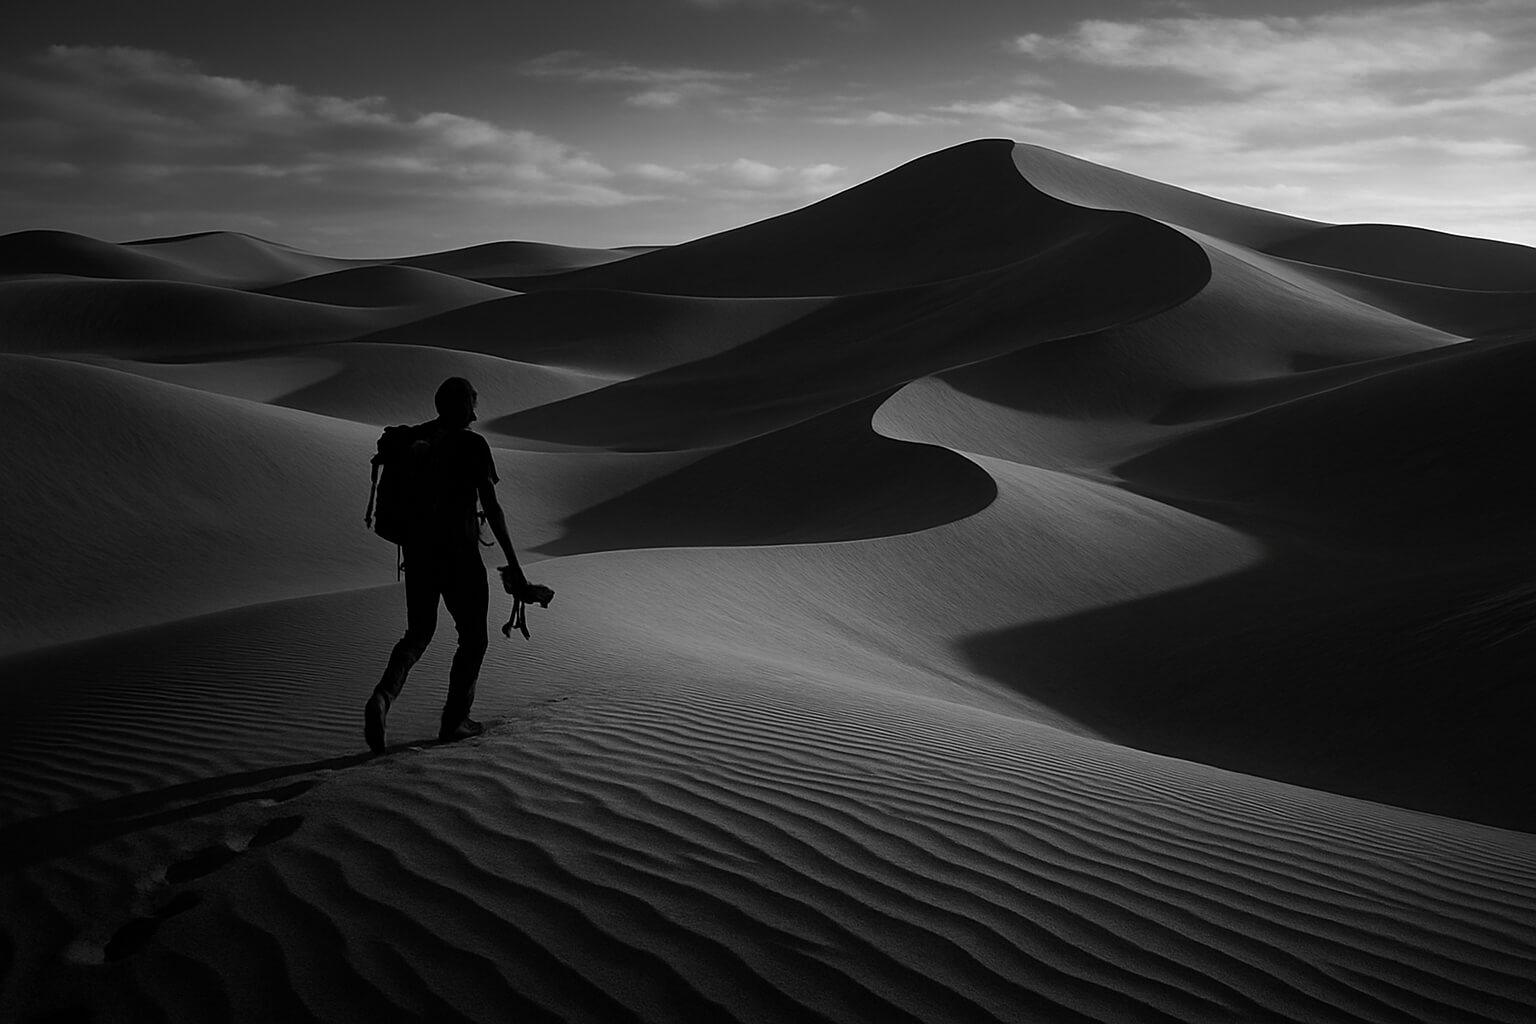
  • Use Negative Space : The desert’s vast emptiness can be as powerful as the subject itself. A lone tree, cactus, or person silhouetted against the vast dunes can evoke feelings of isolation and solitude, creating a compelling emotional impact.


Great desert photography is as much about what you exclude as what you capture.


Post-Processing for Black & White Desert Photography


  1. Convert with Purpose : Instead of just desaturating your image, use conversion tools in Lightroom, Photoshop, or Capture One to have full tonal control. Adjust the individual colors (reds, yellows, etc.) to enhance specific elements of the scene.
  2. Boost Texture & Clarity : Use the Clarity and Texture sliders in Lightroom to enhance sand details and fine textures. Dodge & Burn selectively to deepen shadows and bring out highlights.
  3. Control Tonal Range : Adjust the blacks, shadows, midtones, highlights, and whites to fine-tune the tonal balance of your image. The Curves tool can also be used to adjust contrast and give the image a final sculpted look.


Post-processing is your opportunity to emphasize the mood and lighting of your image.
If you're thinking about diving deeper into photography or scaling a business, check out how to scale a photography business and go full-time.


Pro Tips Before You Go


  • Use Apps like PhotoPills: Planning your shoots in advance can help you understand how light and shadows will interact at different times of day, ensuring you get the best lighting for your shots.
  • Protect Your Gear: Sand and heat can be harsh on your gear. Consider using weather-resistant bags and protective lens filters.
  • Wear Neutral Colors: Avoid wearing bright colors that could reflect onto your subjects, affecting the shot.
  • Stay Safe: Desert environments can be extreme, so always have water, a first aid kit, and a good understanding of the conditions.


Bonus Inspiration


Look to iconic black and white photographers like Ansel Adams and Edward Weston for inspiration. Modern photographers using Instagram also showcase stunning black and white desert photography, turning simple dunes into minimalist masterpieces.


The desert in black and white is not empty—it’s eloquent.
If you’re interested in preserving and restoring your photos, explore the best photo restoration software in 2025.


Conclusion


Black and white desert photography is more than just an aesthetic choice; it’s a way to tell a story through light, form, and texture. By focusing on key elements like contrast, shape, and post-processing techniques, you can create timeless, evocative images that transcend the limits of color photography. Grab your camera, head to the desert, and let the stark beauty of monochrome reveal itself.


Want to make money from your photography? You can start monetizing your images and boost your income by learning how to sell your photos online for passive income in 2025.


Recent Articles

Stay up to date with the newest tips, gear reviews, and step-by-step guides to elevate your photography journey from home and beyond.

Photographer meeting with a high-paying client in a modern studio setting, discussing premium photo services.
How to Get High-Paying Clients for Your Photography Business
Attracting high-paying photography clients isn't about luck—it's about strategy, positioning, and delivering exceptional value. In a saturated market, premium clients seek photographers who not only create stunning work but also provide a seamless, professional experience that reflects their elevated expectations.Whether you're a wedding photographer, branding expert, portrait artist, or fine art creator, this comprehensive guide will help you elevate your brand, attract high-paying clients, and build a sustainable, profitable business.1. Define and Refine Your Photography Niche“If you try to be everything to everyone, you’ll be nothing to anyone.”High-paying clients don’t hire generalists—they hire specialists who clearly understand their unique needs. Your niche is the foundation of your brand identity. It helps you communicate directly to your ideal audience, establish authority, and create work that resonates at a deeper level.Action Steps:Audit your past work: Identify patterns in client feedback, job satisfaction, and profitability.Clarify your passion: What kind of photography excites and energizes you?Validate market demand: Use Google Trends, Instagram hashtags, or speak to professionals in that niche to confirm if there’s demand at premium pricing.Craft a unique positioning statement: E.g., “I help luxury real estate agents sell faster with magazine-worthy interior photography.”Examples of Profitable Niches:High-end wedding photography for destination elopementsLuxury brand product photographyFine art portraiture for family heirloomsExecutive headshots for corporate leadersArchitecture and design photography for real estate developers2. Build a Premium Website That Reflects Your ValueYour website is your digital storefront—and for premium clients, first impressions are everything. If your website feels outdated, slow, or cluttered, potential clients will assume your service is the same.Must-Have Features:Curated Portfolio: Only showcase your best, most relevant work. Tailor galleries to your niche.Clear Services & Packages: Include descriptions, what’s included, and starting prices to set expectations.High-Impact Testimonials: Use quotes, client names, and photos when possible.Engaging “About” Page: Tell your story, philosophy, and why clients love working with you.Fast Load Time & Mobile Optimization: Use tools like Google PageSpeed Insights to improve site performance.Easy Contact/Booking System: Integrate Calendly, HoneyBook, or a custom form to streamline inquiries.Bonus : Invest in a custom domain email (e.g., hello@yourstudio.com) and ensure your site design aligns with your visual brand.3. Create a High-Value Client ExperiencePremium clients aren't just buying photos—they're investing in the experience of working with a trusted professional. Every touchpoint—from inquiry to delivery—should feel polished and intentional.Ways to Elevate the Experience:Pre-Shoot Consultations: Guide clients on wardrobe, locations, or set expectations.Client Welcome Packet: Include timelines, prep tips, policies, and what to expect.On-Time, Quality Delivery: Use premium galleries like Pic-Time or Pixieset with personalized branding.Presentation: Deliver prints in custom boxes or envelopes with handwritten notes.Post-Shoot Follow-Up: Send a thank-you email, feedback form, or referral request.Why It Matters : Exceptional service creates loyalty, referrals, and premium perception. Happy clients become brand ambassadors.4. Market Where High-Paying Clients Spend TimeYou won’t find premium clients on Craigslist or local Facebook swap groups. You need to be visible where your ideal clients already spend their time, both online and offline.Target Platforms by Niche:Corporate Headshots/Branding: LinkedIn, business networking events, Chamber of CommerceWeddings: The Knot, Zola, WeddingWire, Instagram, PinterestInterior/Architectural Photography: Houzz, Instagram, design exposFine Art Prints: Art fairs, galleries, Etsy (curated), personal website with e-commerceContent Marketing Tips:Share behind-the-scenes posts, process videos, and before/after shots on Instagram Stories or Reels.Create educational blog content like “5 Tips to Prepare for Your Personal Branding Shoot.”Post consistently and use targeted hashtags to improve reach.5. Network StrategicallyHigh-value clients often come through word-of-mouth and referrals—not ads. Build genuine relationships with those who serve or influence your ideal clients.Key Networking Partners:Wedding vendors: Planners, florists, venue coordinatorsReal estate professionals: Realtors, stagers, developersInterior designers: Great for fine art print or architectural photography salesMarketing/creative agencies: Outsource photographers for branding shootsLocal business leaders: Great source for recurring headshots or team brandingCollaboration Ideas:Offer styled shoots to showcase both your workProvide professional photos to a partner in exchange for referralsSponsor a high-end event with complimentary photography coverage6. Price for Value, Not CompetitionIf you're competing on price, you're fighting a losing battle. High-paying clients are drawn to quality, confidence, and professionalism—not discounts.How to Set Premium Pricing:Research the market, then exceed expectations.Structure tiered packages that offer increasing value—not just more time or photos.Highlight the experience: Emphasize prep, creative direction, service—not just the final gallery.Raise prices with confidence as your demand and portfolio grow.Tip : Use “value anchoring” in your pricing—position your mid- or top-tier package as the best value compared to the others.7. Use Testimonials and Social ProofNothing builds trust like hearing from real clients who had a great experience. Social proof increases conversions and reassures premium buyers that you deliver.How to Use Testimonials:Display on homepage, services page, and contact pageInclude screenshots from DMs, emails, or review platformsUse client photos or behind-the-scenes clips alongside quotesAsk for Google Reviews (great for local SEO)Bonus : Create video testimonials or “Client Spotlight” blog posts that tell the story of your work together.8. Position Yourself as an ExpertThe more visible and respected you are in your niche, the easier it becomes to justify premium pricing and build trust with high-paying clients.Ways to Build Authority:Write blogs or guest posts on industry websitesTeach workshops or speak at eventsHost webinars or live Q&As for potential clientsCreate YouTube or Instagram content offering tips or insightsPro Tip : Use a lead magnet (like a free guide or checklist) to grow your email list and nurture future premium clients.9. Invest in the Right Tools and PresentationEverything from your invoice to your image delivery speaks volumes about your brand. Invest in tools and systems that support professionalism and scalability.Professional Tools:Client Management: HoneyBook, Dubsado, or Studio NinjaContracts/Payments: HelloSign + Stripe or SquareGallery Delivery: Pixieset, Pic-Time, or ShootProofOnline Booking: Calendly or TaveBranding Essentials:Custom logo, fonts, and brand colorsPremium business cards and thank-you notesBranded email signature and email templatesStyled social media presence that mirrors your niche aestheticFinal Thoughts: Build a Brand That Attracts, Not ChasesHigh-paying clients don’t stumble upon you—they’re drawn to you because your brand, experience, and confidence signal quality.By building a strong niche, creating exceptional experiences, and showcasing your expertise, you stop selling photos—and start delivering transformation, emotion, and legacy.What to Do Next:Audit your current brand presence and client experienceDefine your niche and ideal client profileSet new pricing based on valueStart showing up consistently in the right placesStreamline your workflow with professional tools
Read More
Photographer designing a client-focused photography website with portfolio images and layout sketches on a modern desktop setup.
How to Build a Photography Website for Clients in 2025
"Create Stunning, Functional Sites That Attract & Convert"In today’s digital-first world, a professional photography website is more than a portfolio—it’s a powerful marketing tool, a sales platform, and a way to build trust with potential clients. Whether you're a freelance photographer or running a small studio, building a client-focused website can elevate your brand and grow your business.This guide walks you through how to build a photography website that not only showcases your work beautifully but also attracts and converts visitors into paying clients.Why You Need a Website for Your Photography ClientsWhile social media can showcase your photos, it’s not enough. A dedicated website gives you:Full creative control over how your work is displayedCredibility and professionalismA hub for inquiries, bookings, and salesSEO advantages for local and global discoveryA website acts as your digital business card—and it's open 24/7.Step 1: Choose the Right Website PlatformPick a platform that suits your technical comfort level and goals. Here are the most popular choices:1. RocketPages – Built for Creatives & PhotographersBest for: Photographers who want a fast, optimized, and conversion-focused site—without needing to code.Why Choose It: RocketPages is designed specifically for creators and visual professionals, offering beautifully responsive templates, built-in SEO tools, and seamless integration with client booking and image galleries. You can launch a clean, client-ready website in minutes.Consider This: While RocketPages is feature-rich and beginner-friendly, its design ecosystem may not offer as many third-party plugin options as open-source platforms like WordPress. However, its all-in-one simplicity appeals to photographers who want to focus on their craft rather than tech maintenance.2. Wix or SquarespaceBest for: Beginners who prefer drag-and-drop design with minimal setup.Why Choose It: These platforms offer all-in-one hosting and visually engaging templates, great for showcasing photography portfolios.Consider This: While easy to use, they may limit advanced customization and control over long-term growth.3. WordPress with Elementor or DiviBest for: Experienced users who want maximum customization and plugin flexibility.Why Choose It: With the right theme and builder plugin, WordPress can become a powerful platform for blogging, galleries, SEO, and even ecommerce.Consider This: Setup takes time, and managing updates and security is your responsibility.4. Shopify, Pixpa, or FormatBest for: Selling prints, photo packages, or digital downloads directly from your site.Why Choose It: These tools focus on ecommerce-first features, including product pages, proofing galleries, and payment gateways.Consider This: Ideal if your website’s goal is sales over storytelling or branding.Step 2: Choose a Design That Speaks to Your BrandYour design should reflect your style and target audience. Whether you're a wedding photographer, portrait artist, or commercial shooter, tailor your design to what your clients are looking for.Key Features to Include:Clean gallery layouts: Let your work breathe.Easy navigation: Keep menus simple and intuitive.Responsive design: Ensure your site looks good on all devices.Consistent branding: Fonts, colors, and tone should align with your logo and social presence.Step 3: Showcase Your Portfolio StrategicallyInstead of uploading every shoot you’ve ever done, curate your best work—images that represent your style and the services you want to book more of.Tips:Organize galleries by genre (e.g., weddings, portraits, travel).Include only high-resolution images with optimized loading speeds.Add short captions or stories for context (e.g., location, concept, challenge).Step 4: Create Content That ConvertsGreat photos grab attention—great copy converts.Must-have pages:Home: First impression, brand intro, call-to-action.About: Build trust with a short bio and your story.Portfolio: Highlight your best work in organized categories.Services: Clearly list your offerings, pricing, and what’s included.Contact: Simple form, email, phone, and links to socials.Blog (optional): Share behind-the-scenes, client stories, or photo tips (also great for SEO).Tip: Use language that speaks directly to your ideal client. Focus on the experience and results they’ll get—not just your gear or awards.Step 5: Optimize for SEOSearch engines drive free traffic to your website—if your site is optimized properly.Key SEO Practices:Use descriptive file names and alt text for all imagesOptimize meta titles and descriptions on every pageAdd a sitemap and submit it to Google Search ConsoleUse keywords naturally in headings, URLs, and content (e.g., “New York City wedding photographer”)Optimize site speed using compressed images and a good hosting provider💡 Pro Tip: A well-optimized portfolio can even appear in Google Image search, driving organic inquiries.Step 6: Set Up Client Booking or Sales ToolsIf you work with clients regularly, integrating tools to book sessions, collect payments, or deliver proofs makes your workflow smoother.Useful Features:Online booking: Tools like Calendly or Acuity Scheduling.Payment gateway: Stripe, PayPal, or built-in store checkout.Client galleries: Use platforms like Pixieset, Pic-Time, or ShootProof to deliver images professionally.Step 7: Connect It AllMake sure your website works as part of a larger ecosystem:Link your Instagram, Facebook, Pinterest or TikTokAdd a newsletter sign-up for lead generationUse Google Analytics to track traffic and behaviorSet up Facebook Pixel or other tracking if you plan to run adsFinal ThoughtsBuilding a client-ready photography website isn't just about showing off your talent—it's about providing a seamless, inspiring experience that turns viewers into clients. With the right platform, content, design, and tools, your site can become your most valuable marketing asset.Whether you're starting from scratch or upgrading an old site, treat your website as your digital storefront—one that reflects the quality, emotion, and creativity of your work.
Read More
Photographer editing an image for SEO and social media optimization with performance metrics and social preview screens visible.
How to optimize your photos for SEO and social media
Optimizing your photos isn't just about resizing them; it's about making them work harder for you—by improving your website's SEO, enhancing social media engagement, and ensuring accessibility across devices. Let's delve into each step with actionable insights.1. Name Your Image Files Clearly and DescriptivelyBefore uploading, rename your image files to reflect the content accurately. Descriptive filenames help search engines understand the image context, improving your SEO.Why It Matters: Search engines like Google cannot interpret images directly. Instead, they rely on filenames to infer the image's subject. A descriptive filename, such as sunset-over-mountains.jpg, provides clear context, aiding in better indexing and searchability.Best Practices:Use hyphens (-) to separate words (e.g., family-portrait-beach.jpg).Avoid underscores (_) as they can be misinterpreted.Incorporate relevant keywords naturally, but avoid keyword stuffing.2. Add Alt Text for Accessibility and SEOAlt text (alternative text) describes the content of an image. It's essential for accessibility, helping visually impaired users understand the image through screen readers, and for SEO, as it provides context to search engines.Why It Matters: Alt text serves multiple purposes:SEO: It helps search engines index your images correctly.Accessibility: It ensures that users with visual impairments can understand the image content.User Experience: It provides context when images fail to load.Best Practices:Be descriptive and concise (e.g., A golden retriever puppy playing in a grassy field).Include relevant keywords, but focus on accuracy and clarity.Keep it under 125 characters to ensure compatibility with screen readers.3. Resize and Compress Images Without Sacrificing QualityLarge image files can slow down your website, negatively impacting user experience and SEO rankings. Resizing and compressing images reduces file size while maintaining quality.Why It Matters:Page Load Speed: Faster-loading pages improve user experience and SEO rankings.Mobile Optimization: Compressed images load quicker on mobile devices, enhancing accessibility.Best Practices:Resize images to the dimensions needed on your site (e.g., if the display size is 800x600 pixels, don't upload a 4000x3000 pixel image).Use tools like TinyPNG or Squoosh to compress images without noticeable quality loss.Aim for a file size under 200 KB for standard images and under 500 KB for hero images.4. Use the Right File FormatChoosing the appropriate file format ensures optimal image quality and performance.Why It Matters: Different formats serve different purposes:JPEG: Best for photographs with gradients; offers good compression.PNG: Ideal for images requiring transparency or sharp edges.WebP: Provides high-quality images at smaller file sizes; supported by most modern browsers.GIF: Suitable for simple animations.Best Practices:Use JPEG for photographs and images with gradients.Opt for PNG when transparency is needed.Consider WebP for a balance between quality and file size.Use GIF for simple animations.5. Add Structured Data (Schema Markup)Structured data helps search engines understand the content of your images, potentially enhancing their appearance in search results.Why It Matters: Implementing structured data can:Improve visibility in search results.Enable rich snippets, providing more context to users.Enhance click-through rates.Best Practices:Use schema markup to define image content (e.g., Product, Recipe, VideoObject).Implement structured data using JSON-LD format.Validate your markup using tools like Google's Structured Data Testing Tool.6. Optimize Photos for Social Media PlatformsEach social media platform has specific image size requirements to ensure optimal display.Why It Matters: Properly sized images:Ensure your content appears professional and well-formatted.Improve engagement rates by providing a better user experience.Enhance brand consistency across platforms.Best Practices:Research and adhere to the recommended image dimensions for each platform.Use tools like Canva or Adobe Spark to create platform-specific images.Test how your images appear on different devices to ensure responsiveness.7. Add Captions and Context for Social PostsCaptions provide context to your images, influencing how users perceive and engage with your content.Why It Matters: Effective captions:Enhance storytelling, making your content more relatable.Encourage user interaction through calls to action.Improve SEO by incorporating relevant keywords.Best Practices:Keep captions concise and engaging.Include a call to action (e.g., "Tag a friend who would love this!").Use relevant hashtags to increase discoverability.8. Create and Submit an Image SitemapAn image sitemap helps search engines discover and index your images more efficiently.Why It Matters:Improved Indexing: Ensures that all your images are crawled and indexed.Enhanced Visibility: Increases the chances of your images appearing in search results.Best Practices:Include all image URLs in your sitemap.Use the <image:image> tag to provide additional information about each image.Submit your sitemap through Google Search Console.9. Link Images to Relevant ContentLinking images to relevant content provides additional context and can drive traffic to other parts of your site.Why It Matters:Improved SEO: Internal linking helps search engines understand the structure of your site.Enhanced User Experience: Directs users to related content, increasing engagement.Best Practices:Use descriptive anchor text when linking images.Ensure that the linked content is relevant to the image.Avoid over-linking; ensure that each link adds value.10. Maintain Consistent BrandingConsistent branding across your images reinforces your identity and builds recognition.Why It Matters:Brand Recognition: Consistent visuals make your content easily identifiable.Professionalism: A cohesive aesthetic enhances the perceived quality of your content.Best Practices:Use consistent color schemes, fonts, and logos across your images.Develop a style guide to maintain uniformity.Regularly update your branding to stay current.Final ThoughtsOptimizing your photos for SEO and social media is a multifaceted process that involves technical adjustments, creative strategies, and consistent branding. By implementing these practices, you can enhance your online presence, improve user engagement, and drive more traffic to your site.
Read More